
Imagine Switzerland, stunning mountains, green grass everywhere, sun is shining, you’ve got a view on the Matterhorn, some cows are sitting peacefully next door doing nothing and your are eating some Rösti with your friends.
Have you pictured this lovely time and view in your mind? Sure? Good because that isn’t at all today’s case 😂 I’m in Zürich, it’s super grey outside, it’s rainy, freaking cold and windy but the good point is, it gives me time to write a new blog post 😉
Earlier this week I published a trick I use often about “How to close Ionic modals using the hardware back button” and I thought that I would then share another quick one regarding how to display conditionally a back or menu button in a page of an application developed with Ionic.
UX
You might ask your self “why such a UX”? Well, you might want to list a page in your menu (navigation “root”) but in the same time, you might want to implement a direct link from another page to that particular page without letting you users become confused about how to come back to the caller page (navigation “forward”).
I guess you might be confused about my explanation 🤔 Therefore here’s what would happens if we would implement nothing particular. In both cases, navigation “root” or “forward”, the icon its action would remain linked with the menu.
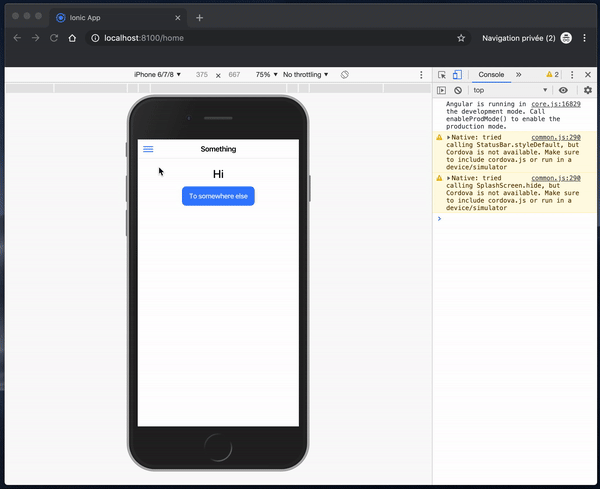
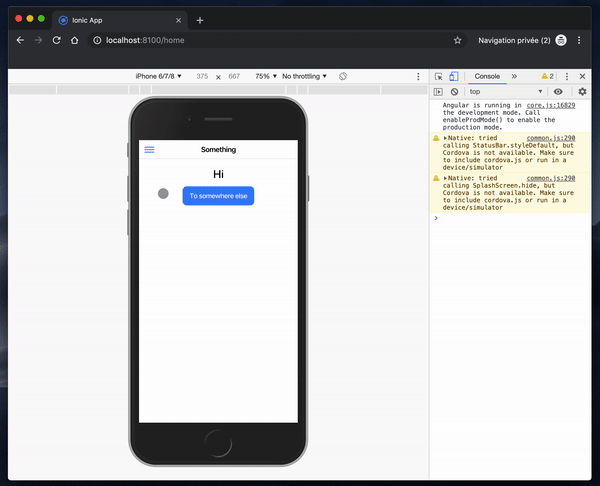
And here’s what we are going to achieve:
Implementation
Our goal is to render an ion-menu-button or an ion-back-button according the navigation as Ionic components are just going to take care of the rest. Therefore, first thing we have to do, is to declare a boolean variable in our page/component to reflect these two states, for example a public boolean variable called canGoBack :
canGoBack: boolean = false;Note: in this blog post I display an Angular implementation
Once added, we could modify the ion-header of our page and add the two conditional buttons:
<ion-header>
  <ion-toolbar>
    <ion-buttons slot="start">
      <ion-back-button *ngIf="canGoBack"></ion-back-button>
      <ion-menu-button *ngIf="!canGoBack"></ion-menu-button>
    </ion-buttons>

    <ion-title>
      Nothing
    </ion-title>
  </ion-toolbar>
</ion-header>
Finally (didn’t I told you, it’s a super quick solution), we just have to
implement the code to affect to correct state on our variable when our
page/component is loading. For that purpose, Ionic provides a handy
IonRouterOutlet which let us know if there is a page in the stack to go back to or none.
import {Component, OnInit} from '@angular/core';
import {IonRouterOutlet} from '@ionic/angular';

@Component({
    selector: 'app-nothing',
    templateUrl: 'nothing.page.html',
    styleUrls: ['nothing.page.scss']
})
export class NothingPage implements OnInit {

    canGoBack: boolean = false;

    constructor(private routerOutlet: IonRouterOutlet) {

    }

    ngOnInit() {
        this.canGoBack = this.routerOutlet &&
                         this.routerOutlet.canGoBack();
    }

}
That’s it, we have implemented a conditional back or menu button and action 🎉
Cherry on the cake 🍒🎂
I like to always end my articles with a last paragraph “Cherry on the cake” where I give another hint or trick related to the content I displayed but in this particular article I don’t have specific in mind. Therefore, instead of something related to the above solution, here’s my dead simple recipe to cook your own Rösti:
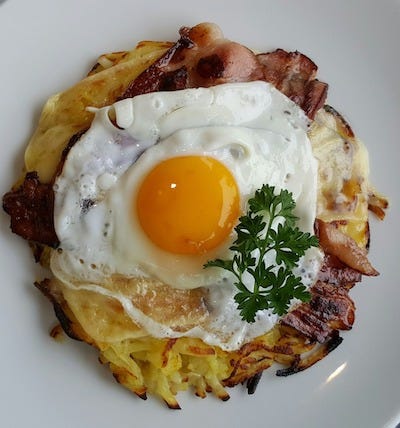
These kind of Rösti but with, optionally, smaller pieces of bacon
- Boil 500 grams to 1 kilo of potatoes (for two) and once ready, let them cool down. Note: that step is optional, if you don’t have time you could cook the meal with raw potatoes but it’s more yummy with boiled ones.
- Chop an onion.
- In a stove, warm up some oil and cook briefly the onion.
- If you are in a hungry mood and not vegetarian, you could now add some small pieces or cubes of bacons in your stove and cook them too. Not necessary, it had a bit of fat to the recipe but it also add some taste, it’s up to you 😉
- Peel the potatoes. In english I think you would use a tool called a “vegetable peeler” for that purpose, in french the tool is called an “économe”.
- Chop the potatoes. For that step you will use a grater or shredder, French I call this tool a “une râpe”.
- Tips and tricks: once peeled, if you wait too much before cooking your potatoes might turn “brownish-weird-grey-color” while cooking. To preserve them, instead of just sparing them on the side, if you are a bit slow like me, you could spare them in a boil of (cold) water which will preserve their “integrity”.
- Add the chopped potatoes to your stove and gild them for 5 minutes.
- Now, bring the heat of the stove down (“medium power”) and shape the potatoes like a cake (“a circle of 20–30 cm diameter and 5 cm height”) with a spatula centered in your stove and DON’T TOUCH THEM for the next 15 minutes, let them cook like this.
- After that time, gonna be a bit tricky, put a flat dinner plate on the top of your potatoes and get them out of the fire REVERSED on your plate.
- If you feel that your stove is now not enough oily, add a bit of oil in it.
- Once done, add back the potatoes we reserved on the plate back on the side which is not yet cooked (get it, that’s why we reversed them)and cook them for another 15 minutes. IMPORTANT: don’t break the cake, the potatoes should remain together, so be gentle in your moves.
- 5 minutes before the end of the cooking, if you wish, you could cook one or two fried eggs in another stove which you could later add on the top of the Rösti. I sometimes do that extract step because the yellow part of the egg will work as a nice “binder” to make things a bit less dry and gives a bit of extra calories and fat, in case that would not be enough yet 🤣
That’s it, once the cooking is over, your Rösti are ready to be eat 🤗
To infinity and beyond 🚀
David