
Photo by Melanie Magdalena on Unsplash
It is possible to populate Gatsby websites using Cloud Firestore with existing plugins and CMS but, you might be looking to implement such solution by yourself, without dependencies, to get the full control on the process.
This was my goal when I recently developed the new website of DeckDeckGo, more precisely when I was looking to present users’ published decks in the dedicated page “Discover”.
In this article I will show you, step by step, how to collect Firestore data to build Gatsby static websites. In addition, as your data might content link to image, I will also show you how to optimize these.
Meta
The current post was originally published in January 2021. It was developed using Gatsby v2 and, its source code is available on GitHub.
Introduction
The feature we are about to develop, takes place at build time. We are going to fetch data saved in a database, Firestore, to generate a static website with Gatsby. This process can be summarized in the following steps:
- Collect the Firestore data
- Inject these in the GraphQL data source of Gastby
- Optimize the images
- Use the information to generate the site
Sample Data
To ease this tutorial and, to have a common point of reference, let’s define our goal to be the display of a list of dogs.
These are going to be fetched from a Firestore collection called dogs.
[
    {
        "breed": "Beagle",
        "img_url": "https://images.dog.ceo/breeds/beagle/n02088364_16065.jpg"
    }
]
Data and images are provided by the free and wonderful Dog API.
Firestore
Most of the other tutorials and posts I found regarding our subject, seems to use the Admin SDK to query the data locally or in the CI.
I am not a big fan of adding dependencies to my projects. In addition, if we are already using Firestore, we most certainly also have already functions in place. Therefore, instead of adding a dependency, we are going to fetch our data through a new HTTP requests function.
Such an approach has also the advantage to make our solution more portable. This tutorial can then be followed with any backend which would expose an API Endpoint to fetch data, not just Firestore.
That being said, at this point you may ask yourself: “But, David, if we do so, anyone can access our data?”.
To which I would answer: “Yes but, I’ve got your back”. Indeed, in a previous article, I shared a simple solution to protect HTTP functions with an authorization bearer.
For simplicity reason, I will not include such verification in following code snippets but, the related GitHub repo does include it.
Function
Given our data structure, we begin our implementation of the function by declaring an interface and a utility function (findDogs) to describe and query data.
No particular logic is applied to the query here. Nevertheless, it is worth to notice, that it de facto does offer all the flexibility you would need. If you would like to apply a filter, limit or order to your data, it is then possible to already applies these at that query level.
Finally, we expose the function and, return the data within the HTTP response.
import * as functions from "firebase-functions";

import * as admin from "firebase-admin";
const app = admin.initializeApp();
app.firestore().settings({ timestampsInSnapshots: true });

interface Dog {
  id: string;
  breed: string;
  img_url: string;
}

const findDogs = async () => {
  const snapshot = await admin.firestore().collection("dogs").get();

  if (!snapshot || !snapshot.docs) {
    return [];
  }

  return snapshot.docs.map((doc) => {
    return {
      id: doc.id,
      ...doc.data()
    } as Dog;
  });
};

export const dogs =
         functions.https.onRequest(async (request, response) => {
  try {
    const dogs: Dog[] = await findDogs();

    response.json(dogs);
  } catch (err) {
    response.status(500).json({
      error: err,
    });
  }
});
Once deployed to Firebase (firebase deploy --only functions:dogs ), we can test our function with a curl command.
#!/bin/sh
curl -i -H "Accept: application/json" -X GET https://us-central1-yourproject.cloudfunctions.net/dogs
Gatsby
To gather data from an API and optimize remote images we, basically, are going to follow the Gatsby’s documentation about the creation of source plugin.
To integrate our feature, which should run once in the process of building our site, we code it in gatsby-node.js to take control on the data in the GraphQL data layer.
Environment
In order to avoid copying and pasting, we add the url to our API in a .env file at the root of our project.
API_URL=https://us-central1-yourproject.cloudfunctions.net/dogsSuch project environment variable is not immediately available in your Node.js scripts. That’s why we have first to add the following snippet to gatsby-node.js to load it.
Fetch
Even though I don’t like to add dependencies to my projects, Node.js does not integrate the Fetch API in its standard. That’s why, anyway, we are adding node-fetch as a development dependency to our project.
npm i node-fetch --save-devWe use the extension point sourceNodes to add our code as we are looking to create nodes to build our site.
const fetch = require("node-fetch");
exports.sourceNodes = async ({ actions, createNodeId, createContentDigest }) => {
try {
const response = await fetch(`${process.env.API_URL}`, {
method: "POST",
headers: {
Accept: "application/json",
"Content-Type": "application/json"
}
});
if (!response?.ok) {
console.error("Cannot fetch dogs data.");
return;
}
const dogs = await response.json();
console.log(dogs);
} catch (err) {
console.error(err);
}
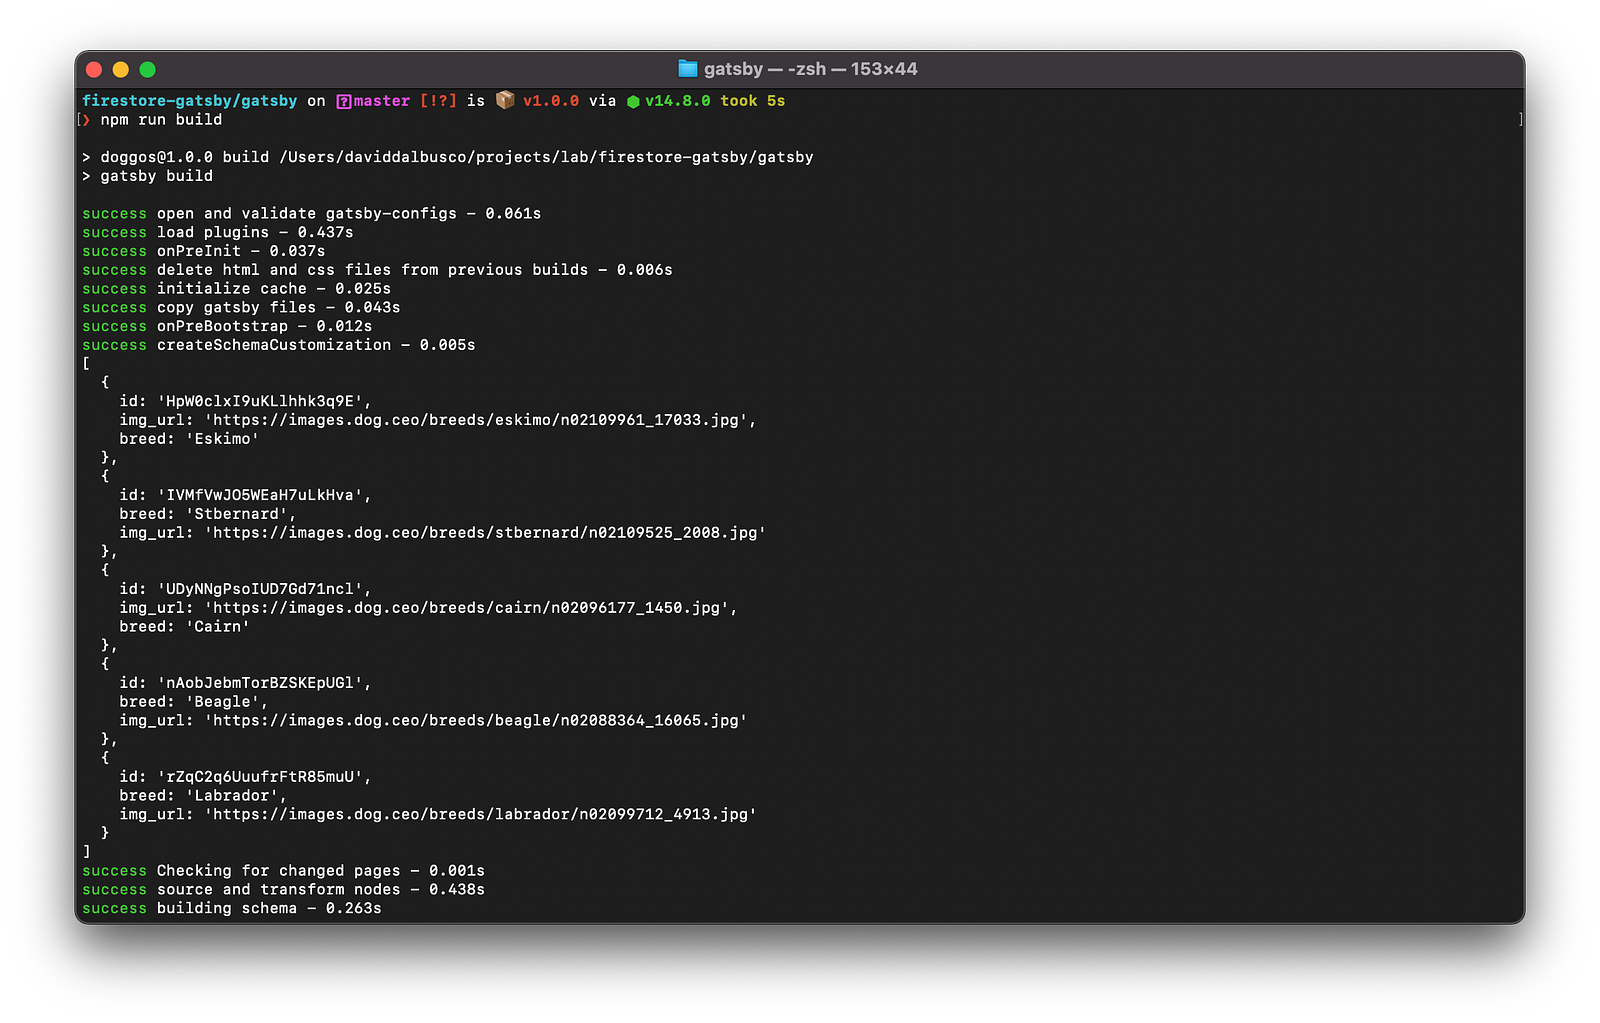
};At this point, if we build (npm run build ) our site, we should notice our data being fetched and printed to the terminal.
Create Nodes
To create Gatsby nodes that are queryable in our site, we iterate on the data, these we fetched with previous function, and, add an entry for each entity using the provided function createNode .
In addition, we define a constant for the node type which we are using to identify the data and which, we will also later on use to optimize the images.
const DOG_NODE_TYPE = "Dog";
const createNodes = (actions, createNodeId, createContentDigest, dogs) => {
const { createNode } = actions;
dogs.forEach((entry) =>
createNode({
...entry,
id: createNodeId(`${DOG_NODE_TYPE}-${entry.id}`),
parent: null,
children: [],
internal: {
type: `${DOG_NODE_TYPE}`,
content: JSON.stringify(entry),
contentDigest: createContentDigest(entry)
}
})
);
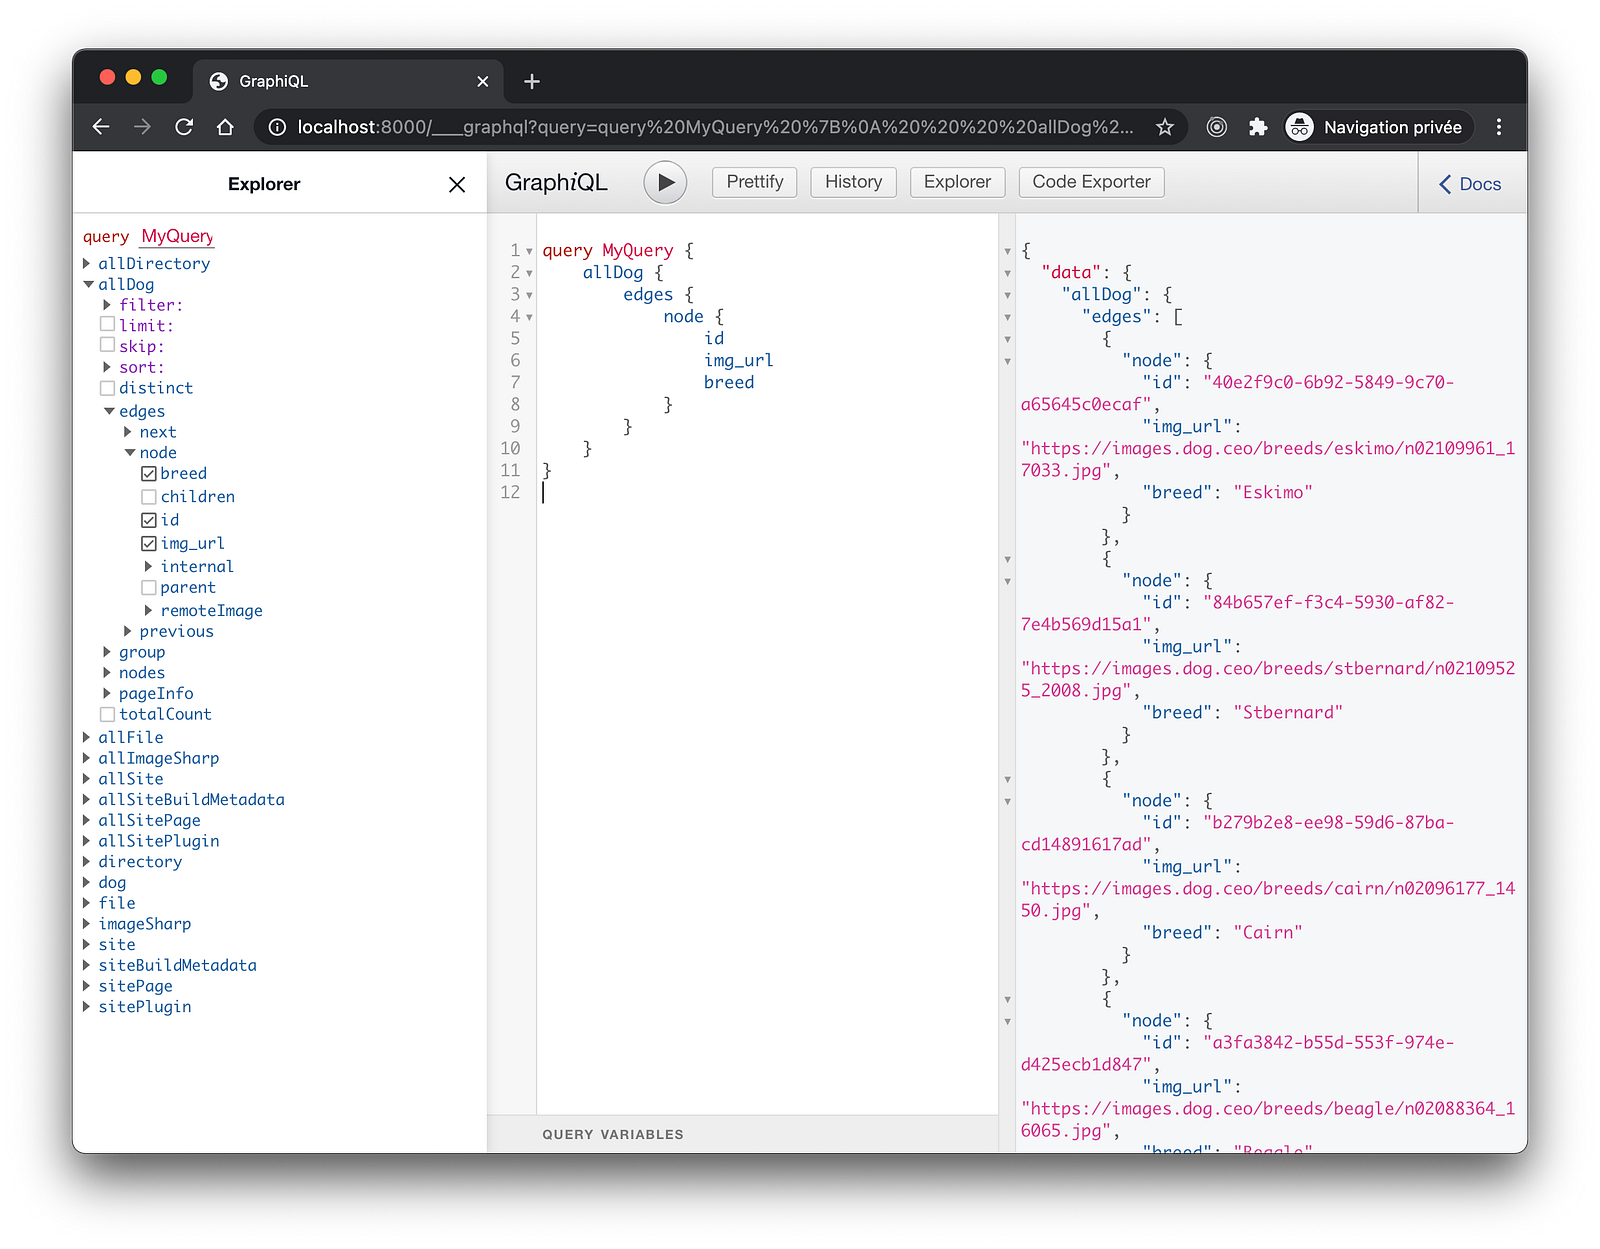
};If we now run our site in development (npm run start ), we can open up http://localhost:8000/___graphql and query your data.
query MyQuery {
    allDog {
        edges {
            node {
                id
                img_url
                breed
            }
        }
    }
}
If successful, we should find all the results delivered by the API.
Query And Display
To query with GraphQL at build time, we use the hook useStaticQuery . Because we do not have optimized the images yet, we only list our data.
import * as React from "react";
import { graphql, useStaticQuery } from "gatsby";
const IndexPage = () => {
const dogs = useStaticQuery(graphql`
query DogQuery {
allDog {
nodes {
id
breed
}
}
}
`);
return (
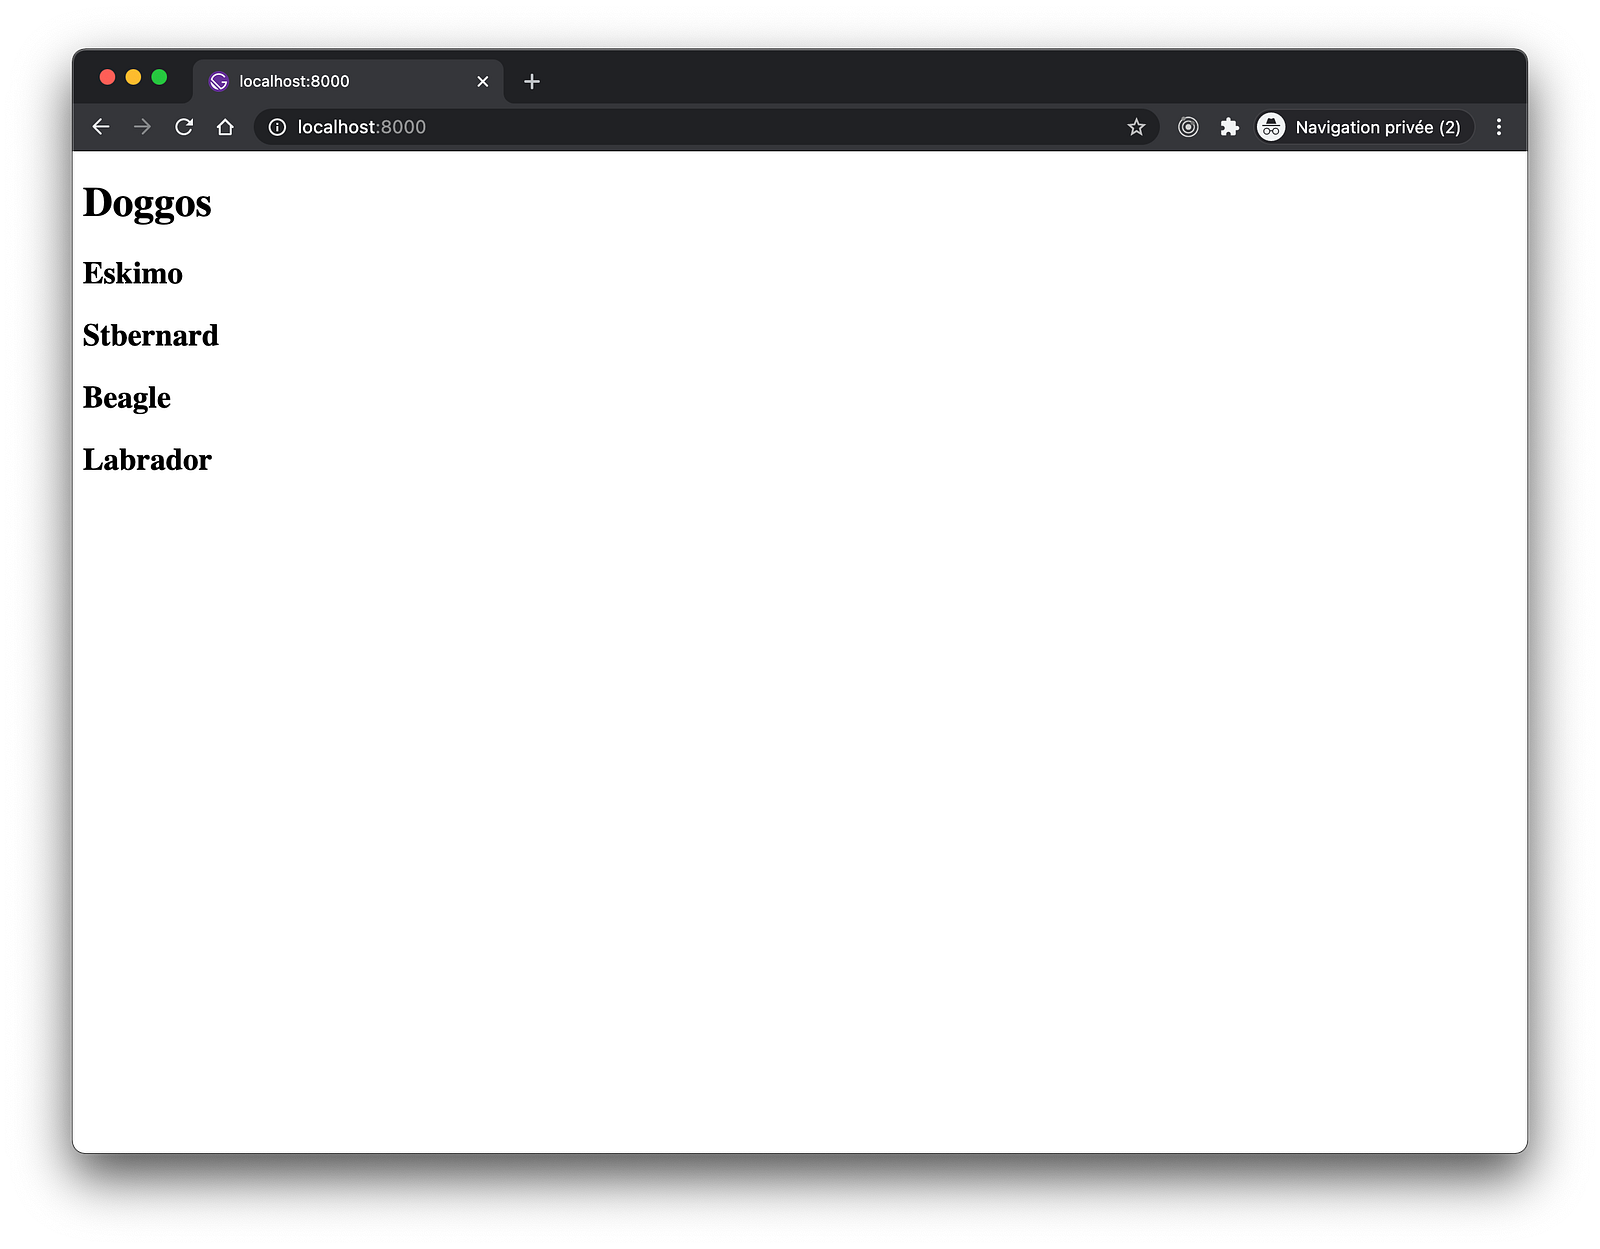
<main>
<h1>Doggos</h1>
{dogs.allDog.nodes.map((dog) => (
<h2 key={dog.id}>{dog.breed}</h2>
))}
</main>
);
};
export default IndexPage;Such minimalistic component produce the following output which, however, confirm us the fact that we are able to fetch data from Firestore and, use these at build time in Gatsby 🥳.
Optimize Images
Our data are link to images stored remotely. To download these in order to be able to work with them locally, we are using the official gatsby-source-filesystemplugin.
To integrate it in our feature, we add a function onCreateNode which will be called each time a node is created. That’s why we introduced a constant for the node type so that we only download those images we are interested in.
const { createRemoteFileNode } = require(`gatsby-source-filesystem`);
exports.onCreateNode = async ({ node, actions: { createNode }, createNodeId, getCache }) => {
if (node.internal.type === DOG_NODE_TYPE) {
const fileNode = await createRemoteFileNode({
url: node.img_url,
parentNodeId: node.id,
createNode,
createNodeId,
getCache
});
if (fileNode) {
node.remoteImage___NODE = fileNode.id;
}
}
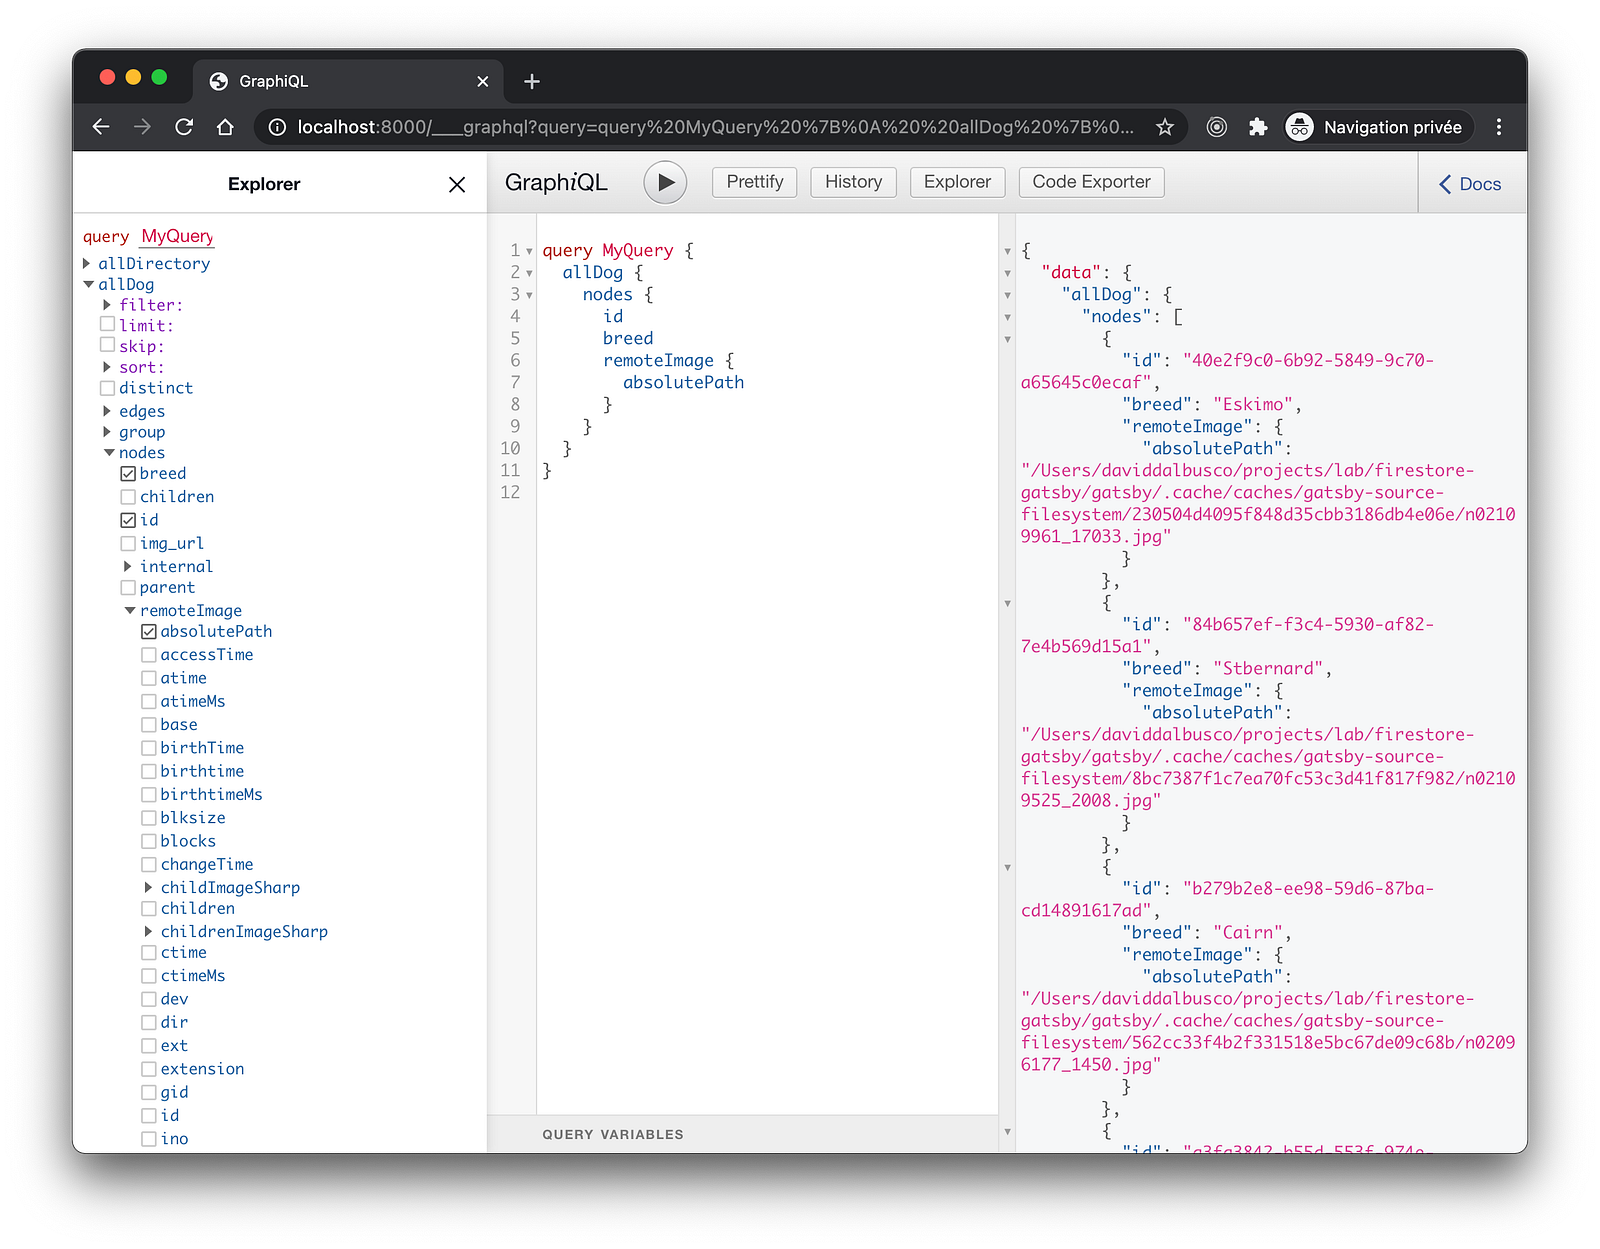
};By assigning the field called remoteImage___NODE , Gatsby will be able to infer a connection between this field and the file node. This allows us to query the downloaded images.
query MyQuery {
  allDog {
    nodes {
      id
      breed
      remoteImage {
        absolutePath
      }
    }
  }
}
To make the optimization of images possible at build time, we double check that the default gatsby-plugin-sharp and gatsby-transformer-sharp plugins are installed in our project.
If not, install these and, add them to your gatsby-config.js.
We also modify our query to verify that, indeed, images have been optimized by finding related childImageSharp nodes.
query MyQuery {
  allDog {
    nodes {
      id
      breed
      remoteImage {
        childImageSharp {
          id
        }
      }
    }
  }
}
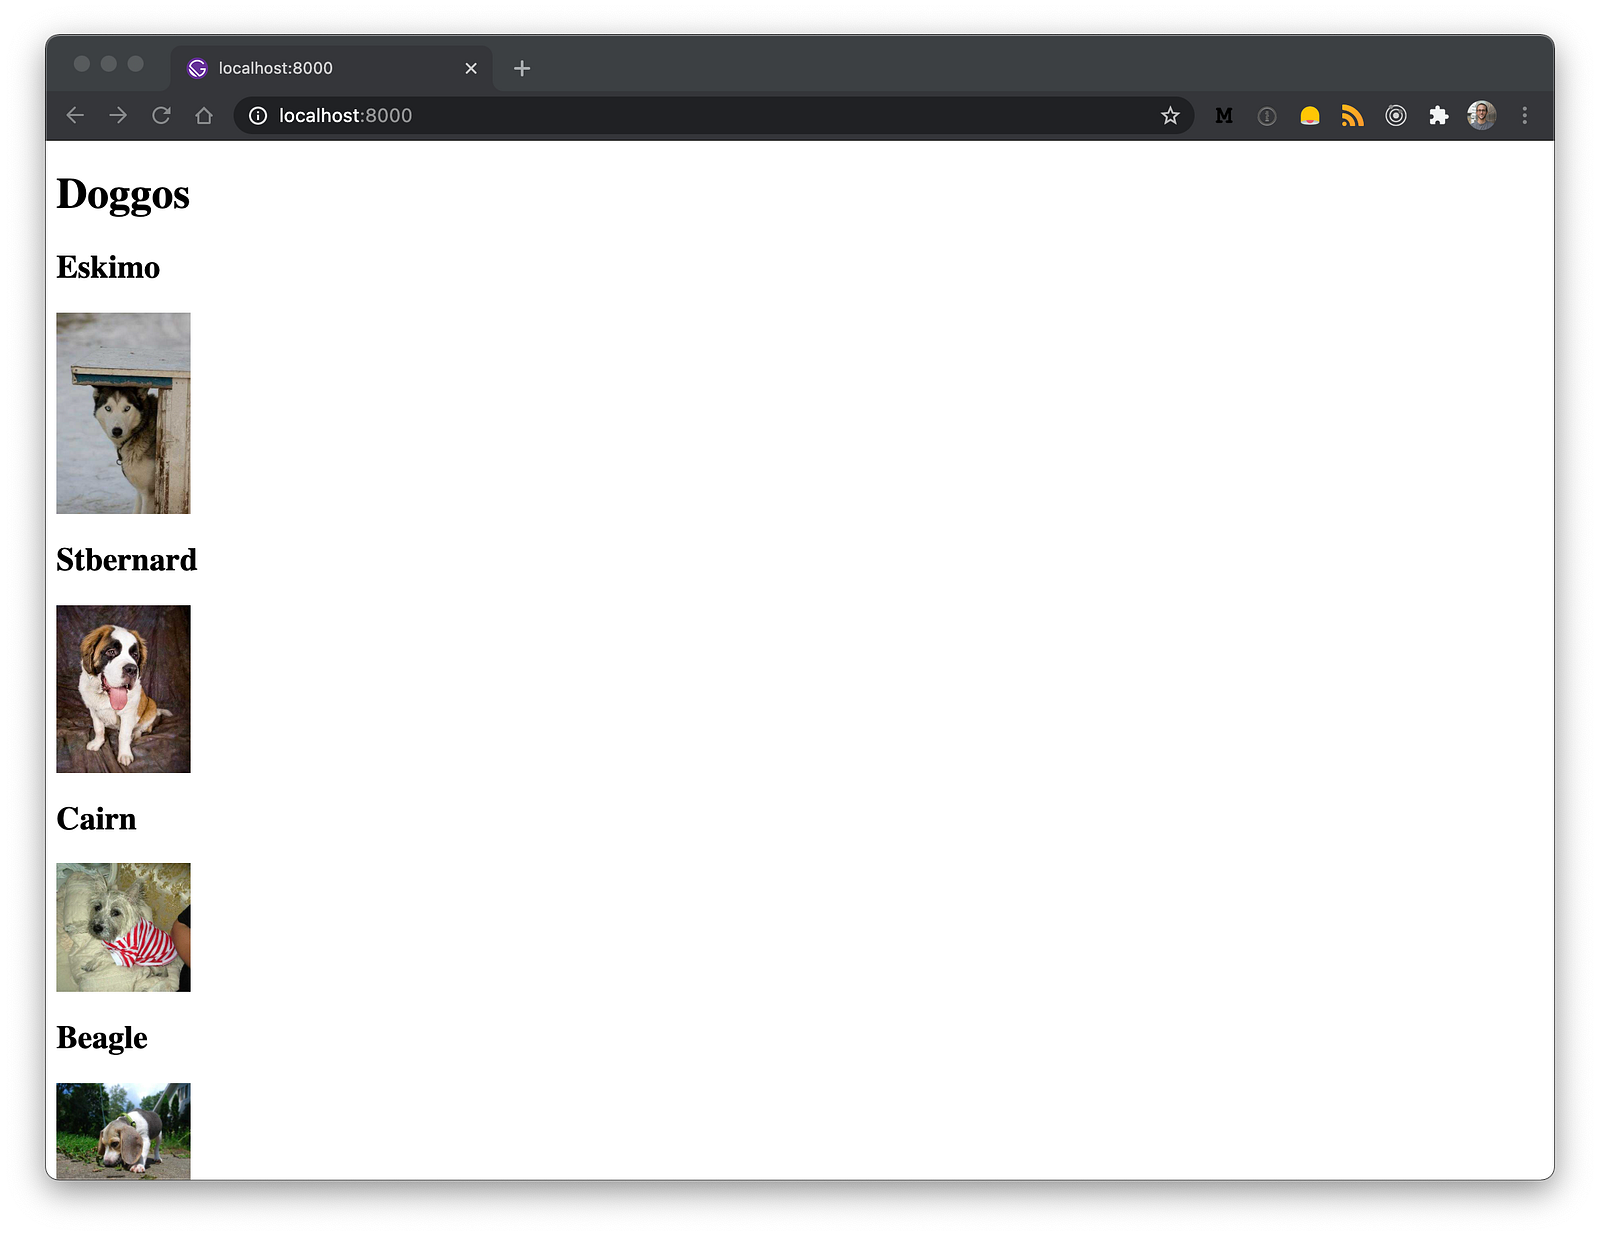
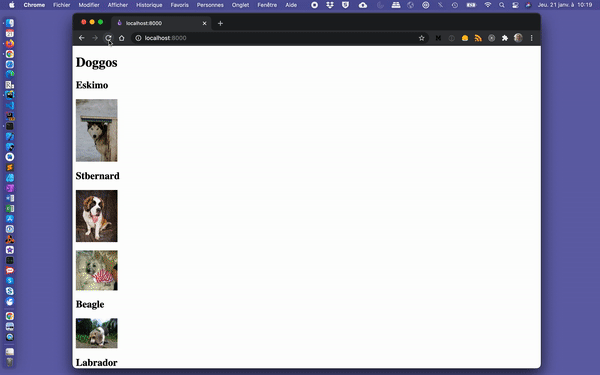
Finally, we reflect the improvements to the GraphQL query in our component and, we render the images using the gatsby-image component.
import * as React from "react";
import { graphql, useStaticQuery } from "gatsby";

import Img from "gatsby-image";

const IndexPage = () => {
    const dogs = useStaticQuery(graphql`
        query DogQuery {
            allDog {
                nodes {
                    id
                    breed
                    remoteImage {
                        childImageSharp {
                            id
                            fluid {
                                ...GatsbyImageSharpFluid
                            }
                        }
                    }
                }
            }
        }
    `);

    return (
        <main>
            <h1>Doggos</h1>

            {dogs.allDog.nodes.map((dog) => (
                <article key={dog.id}>
                    <h2>{dog.breed}</h2>

                    <Img
                        fluid={dog.remoteImage.childImageSharp.fluid}
                        alt={dog.breed}
                        style={{ width: "100px" }}
                    />
                </article>
            ))}
        </main>
    );
};

export default IndexPage;
In addition to being displayed, our images should now appear with a “blur-up” effect while the images are being lazy-loaded.
Gif slowed down to 0.25% of its original speed.
Development
The solution is implemented 🎉. Nevertheless, we probably do not want to fetch data from Firestore while we are developing our site and thus, each time we restart our local server. Firebase pricing model being based on number of reads, writes, and deletes that we perform.
That’s why, I suggest to create a sample data at the root of the project. A file we can, for example, called data.sample.json . It should reflect the response provided by the API.
[
    {
        "id": "HpW0clxI9uKLlhhk3q9E",
        "img_url": "https://images.dog.ceo/breeds/eskimo/n02109961_17033.jpg",
        "breed": "Eskimo"
    }
]
Finally, we can enhance our createNodes function to intercept the development environment and, read the sample data instead of querying the API.
const fetch = require("node-fetch");
const fs = require("fs");

exports.sourceNodes = async ({ actions, createNodeId, createContentDigest }) => {
    try {
        const activeEnv = process.env.GATSBY_ACTIVE_ENV || process.env.NODE_ENV || "development";

        if (activeEnv !== "production") {
            const feed = JSON.parse(fs.readFileSync("./dogs.sample.json"));
            createNodes(actions, createNodeId, createContentDigest, feed);

            return;
        }

        const response = await fetch(`${process.env.API_URL}`, {
            method: "POST",
            headers: {
                Accept: "application/json",
                "Content-Type": "application/json"
            }
        });

        if (!response?.ok) {
            console.error("Cannot fetch dogs data.");
            return;
        }

        const dogs = await response.json();

        createNodes(actions, createNodeId, createContentDigest, dogs);
    } catch (err) {
        console.error(err);
    }
};
Take Away
I personally find this solution interesting for static data or even for data, which do not change that often. In our project, I have set our deployment GitHub actions to run on publish and, once a week to ensure that, at least once a week, the last published presentations of our users made it to our showcase.
To infinity and beyond!
David