I’ve never been a fan of slides. Similarly, I find the typical “hello world” demos a bit too simplistic for my taste. So, when I was recently given the opportunity to demonstrate the joys of local development with Juno — essentially, to highlight the cool aspects of the developer experience — I naturally gravitated towards live coding. I decided to dive deep and spend a few days crafting an app that’s nearly fully featured.
This project also marked my first foray into using the ChatGPT API. It seemed like the perfect chance to not only broaden my skill set but to explore an intriguing possibility: generating an image from another image using AI. As of March 2024, this functionality isn’t directly offered by OpenAI. However, I’ve discovered a creative workaround, which I’m excited to share with you in this blog post.
Side note: For those of you who are curious about the nuts and bolts of my demo, or just love diving into the details, I’ve shared a thread on X / Twitter complete with videos and a link to the repository.
The Concept
This approach is built upon a simple yet inventive use of technology. Users start by creating a drawing, which is then uploaded to the web. From there, it’s propelled into the next phase of its transformation through the capabilities of OpenAI’s Vision API.
The Vision API is primarily designed to understand and interpret images — to identify what’s depicted in a picture and answer questions about its contents. It’s not inherently built to create new images from existing ones. However, it has the ability to generate text-based responses, including code, based on the visual information it processes.
Capitalizing on this functionality, the idea emerged to leverage the API’s capacity for generating code, specifically in the form of SVG. SVG is a versatile image format defined in XML code, which means that, indirectly, the Vision API can be prompted to “generate” an image by producing SVG code.
This method doesn’t generate an image in the traditional sense, where an AI directly creates a new visual piece. Instead, it transforms the interpretation of the original drawing into a new format — an SVG — based on the AI’s understanding and descriptive capabilities. It’s a creative workaround that combines the analytical strength of AI with the imaginative expressions of users, resulting in a unique digital alchemy that turns drawings into a form of AI-generated art, albeit through an unconventional path.
Getting Started
Having laid the groundwork with our concept, let’s move forward by crafting a minimalist application to implement it.
First, we’ll start with a basic HTML page. It will feature a button to initiate the SVG generation process and a div element where the AI-generated SVG will be rendered.
<!doctype html>
<html lang="en">
    <body>
        <button id="generate" type="button">Generate</button>

        <div id="output"></div>

        <script type="module" src="/src/main.ts"></script>
    </body>
</html>
Next, we’ll implement a script that handles the interaction by binding a click event to the button and rendering the AI-generated SVG in the DOM.
Note that I’m skipping nullish validation and error handling for the sake of simplifying this post.
import { generate } from "./chatgpt.ts";

document.addEventListener(
    "DOMContentLoaded",
    () => {
        const btn = document.querySelector("#generate");

        const onClick = async () => {
            const { svgOuterHTML } = await generate();

            document.querySelector("#output").innerHTML = svgOuterHTML;
        };

        btn.addEventListener("click", onClick, { passive: true });
    },
    { once: true }
);
At this stage, we’re ready to set up the generate function. This function will kick off the process with the OpenAI API and handle the result, ultimately providing it back to the user. For now, we'll outline a basic version and refine it with the actual API call later:
export const generate = async (): Promise<{ svgOuterHTML: string }> => {
    const previewResponse = await call();

    return { svgOuterHTML: "TODO implement me" };
};
Integrating OpenAI API
In this chapter, we dive deeper into the technical aspects of making the call to the OpenAI API, crucial for transforming user sketches into high-fidelity SVG images. Here’s how we go about it:
Securing an OpenAI API Key: The process begins with obtaining an OpenAI API key, a crucial step for authentication. In our example, we represent this key with a constant called OPENAI_API_KEY. This key should be replaced by your own key.
Crafting the System Prompt: The heart of our request to OpenAI lies in a system prompt. This detailed prompt guides the AI to understand exactly what we’re asking for — a high-fidelity SVG based on a low-fidelity sketch. It not only sets the context for the AI, outlining a specific expertise in web design and SVG programming inspired by expressionism, surrealism, and Bauhaus design principles — you can, of course, be more creative with those details when implementing your own solution — but it also explicitly instructs the AI to return a single SVG file. This ensures the AI’s output aligns precisely with our needs.
Preparing the Fetch Request: The body of our fetch call is meticulously prepared to communicate our requirements to OpenAI. It includes the system prompt and a URL to the source image, here represented by DRAWING_URL. This URL points to a sketch that we've uploaded to the web. Though the process of converting a user's drawing to an image and uploading it isn't covered here, it's a necessary step before making this call.
Executing the Call and Handling the Response: With everything in place, we execute a fetch request to OpenAI's API. This request is sent with the appropriate headers, including our API key for authentication. Upon receiving a response, we check for success and then parse the JSON data. This data, ideally, contains the SVG code generated by the AI in response to our prompt and image.
const OPENAI_API_KEY = "my_openai_api_key";

const SYSTEM_PROMPT = `You are an expert web designer who specializes in programming SVG.
You are famous for designing those SVG while following movements of arts that included expressionism and surrealism.
You explored color theory as well.
You used to taught at the Bauhaus school of art and design in Germany.
A user will provide you with a low-fidelity sketch of an drawing.
You will return a single SVG file to create a high fidelity improved drawing that can be used as a background or hero pane on a website.
You like to add colors and gradients in your work so will you do with this SVG.
You also like to add some forms and additional objects of your own creation within the drawing.
You are also a big fan a punk music which influences your style by making things not too square.
The user will provide you with notes in blue or red text, arrows, or drawings.
Respond ONLY with the contents of the SVG file.`; // <--- We only want SVG

const DRAWING_URL = "https://domain.com/your-drawing.png";

const call = async (): Promise<Gpt4VisionPreviewResponse> => {
    const body: GPT4VVisionPayload = {
        model: "gpt-4-vision-preview",
        max_tokens: 4096,
        temperature: 0,
        messages: [
            {
                role: "system",
                content: SYSTEM_PROMPT
            },
            {
                role: "user",
                content: [
                    {
                        type: "image_url",
                        image_url: {
                            url: DRAWING_URL,
                            detail: "high"
                        }
                    },
                    {
                        type: "text",
                        text: "Turn this into a single svg file." // <--- We only want SVG
                    }
                ]
            }
        ]
    };

    const response = await fetch("https://api.openai.com/v1/chat/completions", {
        method: "POST",
        headers: {
            "Content-Type": "application/json",
            Authorization: `Bearer ${OPENAI_API_KEY}`
        },
        body: JSON.stringify(body)
    });

    if (!response.ok) {
        throw new Error(`Response not ok. Status ${response.status}. Message ${response.statusText}.`);
    }

    return await response.json();
};
Note that for this solution, I used my own TypeScript types, as detailed below. Alternatively, you can use the official Node.js/TypeScript library for the OpenAI API (repo).
/**
 * Request
 */

type GPT4VVisionPayloadMessageContent =
    | string
    | (
            | string
            | {
                    type: "image_url";
                    image_url: {
                        url: string;
                        detail: "low" | "high" | "auto";
                    };
              }
            | {
                    type: "text";
                    text: string;
              }
      )[];

export interface GPT4VVisionPayloadMessage {
    role: "system" | "user" | "assistant" | "function";
    content: GPT4VVisionPayloadMessageContent;
    name?: string | undefined;
}

export interface GPT4VVisionPayload {
    model: "gpt-4-vision-preview";
    max_tokens?: number | undefined;
    temperature?: number | undefined;
    messages: GPT4VVisionPayloadMessage[];
}

/**
 * Response
 */

interface Gpt4VisionPreviewResponse {
    id: string;
    object: string;
    created: number;
    model: string;
    usage: Gpt4VisionPreviewUsage;
    choices: Gpt4VisionPreviewChoice[];
}

interface Gpt4VisionPreviewUsage {
    prompt_tokens: number;
    completion_tokens: number;
    total_tokens: number;
}

interface Gpt4VisionPreviewChoice {
    message: Gpt4VisionPreviewMessage;
    finish_reason: String;
    index: number;
}

interface Gpt4VisionPreviewMessage {
    role: string;
    content: string;
}
Finalizing: Processing AI Responses
In the concluding chapter, we circle back to complete our generate function, initially outlined but left unfinished in a previous section.
export const generate = async (): Promise<{ svgOuterHTML: string }> => {
    const previewResponse = await call();

    const {
        choices: [choice]
    } = previewResponse;

    const {
        message: { content }
    } = choice;

    // Stripping the markdown code block syntax to isolate the SVG code
    return { svgOuterHTML: content.replace("```svg", "").replace("```", "") };
};
This function invokes the call function, which communicates with the OpenAI API to submit our request. Upon receiving the response, it extracts the first choice (assuming the API might return multiple options) and then focuses on the message content, which contains our SVG code wrapped in markdown syntax. The final step strips this syntax to yield clean SVG code, ready for rendering in our application’s UI.
Wrapping Up
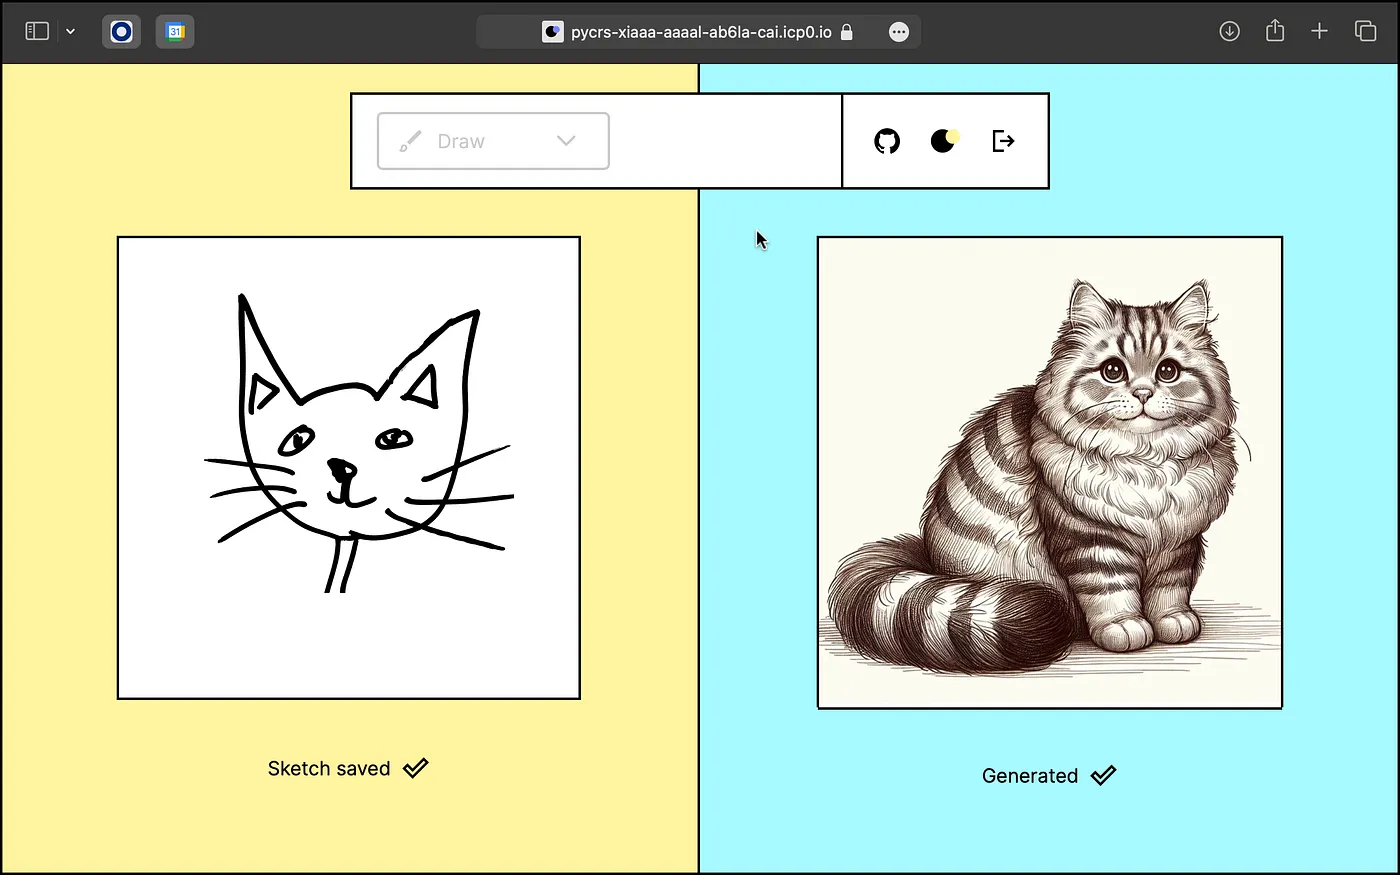
And there you have it — the entirety of our solution, from concept to completion. If you’ve followed along and implemented this on your side, you should see results similar to the one in the screenshot I’m sharing below, which demonstrates the transformation of a hand-drawn pineapple into a refined SVG.

Thank you for reading! I hope it inspires you to explore further intersections of art, technology, and AI in your projects.