
Photo by Nenad Novaković on Unsplash
I've been running the Alps for a few years now. At some point I wanted my own record of it, not just a Strava feed, but something on my own site. So I started building a Trails section with the GPX tracks and photos of my "adventures".
Building it was also a good excuse to take a look at the map landscape nowadays, and it turned out that "just add a map" was a bit of a bigger question than it sounds. So, I developed it like this.
Finding a map
Whatever library you pick to render a map, Leaflet, MapLibre, or anything else, it draws what you give it. You need your data, but you also need a source of tiles (raster images or vector geometry) to actually see a map, and that's the part that turns "add a map" into a real decision.
The options
I went looking, and from what I understood, those are the options I had to gather the tiles:
Self-hosting
Since I already self-host my website, my analytics, and other tools, checking whether I could self-host the map tiles too was my first instinct. I found Protomaps, which publishes pre-built vector tile archives you can just serve as static files. Minimal setup, exactly my kind of thing. However, looking at the actual rendering, it wasn't quite the look I wanted. Since I'm displaying trails in the mountains, I wanted some relief, not a flat design.
I then came across a project called Mapterhorn, mentioned in Protomaps' blog, meant to provide exactly that kind of elevation data, but I wasn't exactly sure how to put all the pieces together, nor whether it was still in development or production ready. It would have been cool to use, as it seems to be developed in Zurich.
I also looked at serving - and generating - my own tiles with Planetiler plus Martin or TileServer GL, but even if someone more comfortable with DevOps would say it's not that much work, it felt like more overhead and maintenance than I wanted to take on for a personal site.
Long story short, I got lost in limbo.
Regional data
Since I mostly run in Switzerland, I then checked if swisstopo, the national mapping agency, had an API.
Spoiler alert: they do, and it's a really interesting service. They serve their own tiles, satellite imagery included, for free, no signup, no API key, just a fair-use policy.
I was tempted, but since I also wanted to show off (brag 😅) the mountains I ran when I visited Japan, that ruled it out.
Commercial providers
Ultimately I opened up to the idea of using a third-party cloud provider, MapTiler (was pleased to learn they're also based in Switzerland, at least part of it, it seems) and Carto looked like solid options. Both work as a drop-in source for Leaflet or MapLibre, and have a free tier. MapTiler even ships an "Outdoor" style with trails built in, exactly the look I had in mind.
The catch is that free tiers come with quotas, though generous enough for a website like mine. Carto even seems to have an unlimited free tier, but to be honest with you, their tagline "The Agentic GIS Platform" just ruled them out.
There is also Mapbox, which felt too commercial and Google Maps API was not even an option.
While browsing further, I noticed that Wikiloc actually displayed an "Apple" footer in their maps. I told myself: wait, Apple is also a map provider?
What I picked
I ended up going with the last option. Apple has its own closed map renderer, exposed as a JS library for the web, and they'd just released a newest version. If you already have an Apple Developer Program membership ($99/year), it's "free" to use, with a daily quota of 250,000 map views and 25,000 service calls.
That's my case, since I publish a few app updates to their store each year, and it always felt like a bit of a scam to pay for it every year as it does not seem worth the money. So I figured, why not get some value back out of it by actually using it for something. Plus, their free tier should easily cover the little traffic of my website.
Building it
Here's how I actually wired it into the Trails page.
Getting started
To show anything on a map, you need points. In my case, those come from parsing the GPX data of each trail. I'll skip that part here for brevity, but each point ends up looking like this: a coordinate (latitude and longitude) and a unique id.
interface MapGpxPoint {
    id: string;
    lat: number;
    lon: number;
}
The id is optional but useful when you want to manipulate the points on the UI side, for example when hovering a point on the map.
Loading the map
There's an official open source mapkit-loader to bring the library in, though I have to say that even though I used it, I'm not fully sold on it.
The loader injects a script tag into the page. On one hand, I would have preferred an await import() API, arguably a matter of taste, but on the other, injecting a script tag at runtime within my app is never something I'm really a fan of (#paranoid) and could raise some questions around handling the Content-Security-Policy (the library does support a nonce, though it's not the most elegant solution).
It also seems to load the entire MapKit core regardless of what you actually use, which makes me wonder if that couldn't be trimmed down for performance.
Lastly, you end up holding two separate entities in your state if you want to manipulate the map once it's rendered: the MapKit API itself, and the interactive map instance. I would have expected a single reference.
Anyway, I could have rewritten the loader but couldn't really influence the rest, so I just went with it.
import { load, type MapKit as AppleMapKit, type Map } from "@apple/mapkit-loader";

export interface MapKit {
    mapkit: AppleMapKit;
    map: Map;
}

export const loadMap = async ({ anchor }: { anchor: HTMLElement }): Promise<MapKit> => {
    const mapkit = await load({
        libraries: ["map", "annotations", "overlays"],
        token: "YOUR_TOKEN"
    });

    const map = new mapkit.Map(anchor);

    return {
        mapkit,
        map
    };
};
Loading the map requires a token, which you can create in your Apple Developer Dashboard and which can be scoped to a specific domain. For now, we just keep it simple and hardcoded, I'll come back to how I actually handle it in production later on in this blog post.
The libraries are the list of services you need for your map. Since all I'm doing is showing a map, a route, and a couple of markers, map, annotations, and overlays cover it.
Displaying markers
Each trail on the site needs a starting point marked on the map. A visual hint of where the trail begins, but also something a visitor can click to actually open the trail page from the map itself.
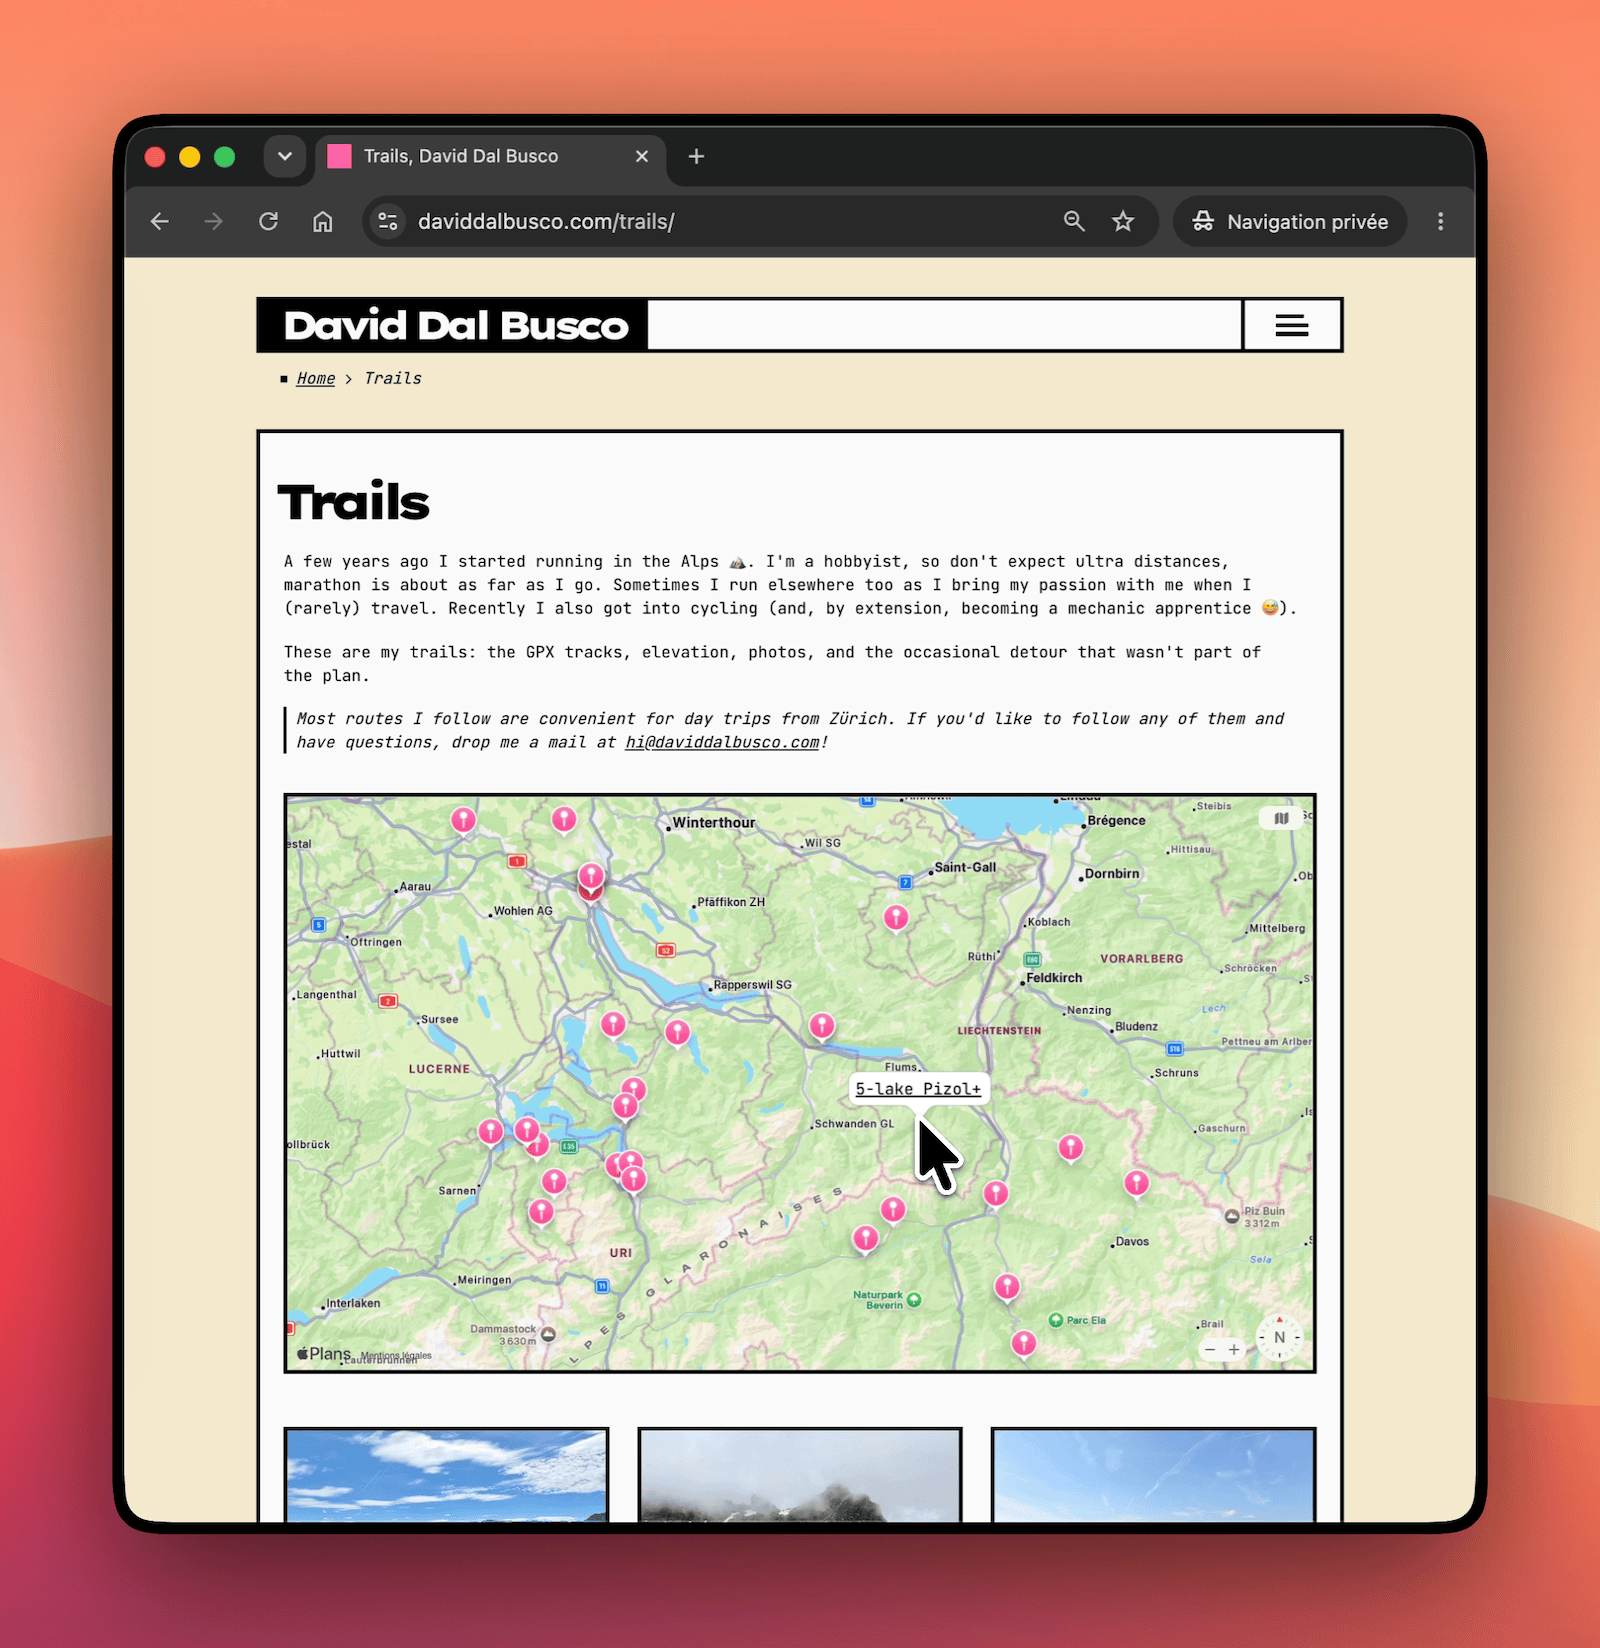
A marker is a mapkit.MarkerAnnotation, adding an annotation is what gets a point displayed. The popover, the link, is resolved with a custom callout shown in a bubble:
const markers = annotations.map(
    ({ location: { lat, lon }, title, pathname }) =>
        new mapkit.MarkerAnnotation(new mapkit.Coordinate(lat, lon), {
            title,
            callout: {
                calloutContentForAnnotation: () => {
                    const link = document.createElement("a");
                    link.href = pathname;
                    link.textContent = title;
                    link.setAttribute("aria-label", `View ${title}`);
                    return link;
                }
            }
        })
);

map.addAnnotations(markers);
An annotation is really just a GPS point extended with a bit of metadata, a title, and a link (pathname) to navigate to when clicked:
interface MapAnnotation {
    location: MapGpxPoint;
    title: string;
    pathname: string;
}
There's more to configure than that, colors, custom glyphs, visibility of the title, and so on.
Drawing the route
Displaying a Trails section has two components: a list and a details page. While showing all the trails with markers could be resolved by the previous chapter, on the details page I wanted to go a step further by drawing the route, the actual trace I followed when I ran or biked.
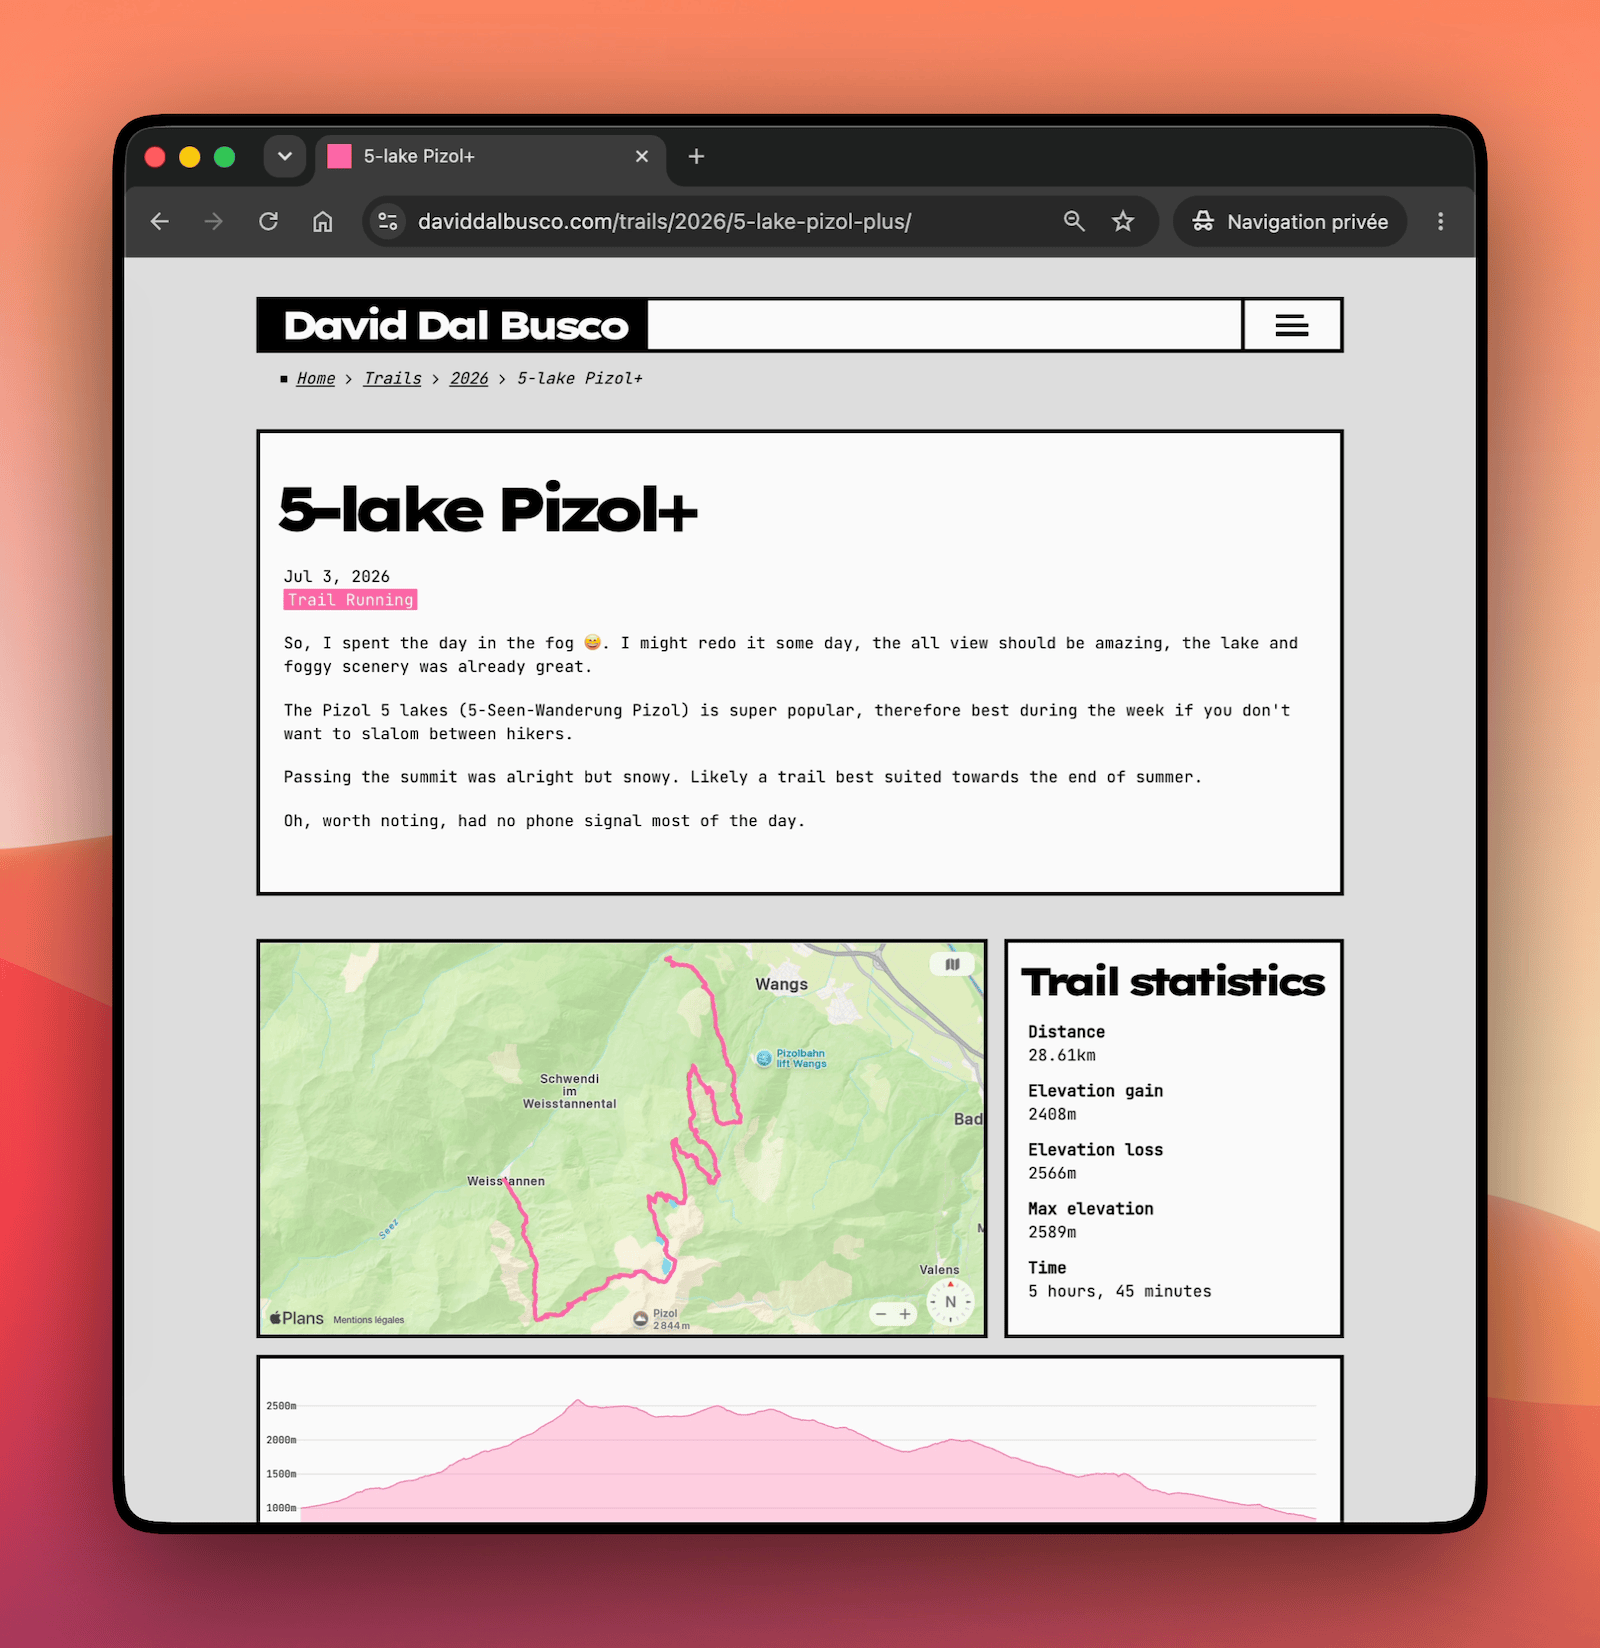
This can be resolved by mapping all the points of a track to coordinates and joining those through an overlay.
const coordinates = points.map(({ lat, lon }) => new mapkit.Coordinate(lat, lon));

const routeOverlay = new mapkit.PolylineOverlay(coordinates, {
    style: new mapkit.Style({
        lineWidth: 4,
        strokeColor: "#ff65a9",
        lineJoin: "round",
        lineCap: "round"
    })
});

map.addOverlay(routeOverlay);
Once both the markers and the route are added, map.showItems([...markers, routeOverlay]) adjusts the camera to fit everything, no manual center/zoom math needed.
Keeping everything in frame
Once all the points and the route are loaded, I show everything on screen. If I added a point in Switzerland and one in Japan, I want the map to show both, not be centered in South America ;)
const focusItems = () => {
    if (kit === undefined) {
        return;
    }

    const { map } = kit;

    const items = [...(map.annotations ?? []), ...(map.overlays ?? [])];

    if (items.length > 0) {
        map.showItems(items);
    }
};
Worth noting my site doesn't load anything in the maps dynamically at runtime, so there's no UX quirk where the map would recenter while the user isn't expecting it.
Syncing a point
On the details page, I also render an elevation chart (maybe a topic for another blog post). Similarly to what Wikiloc and Strava do, I wanted the map to show the point corresponding to the elevation the user is hovering over on the chart.
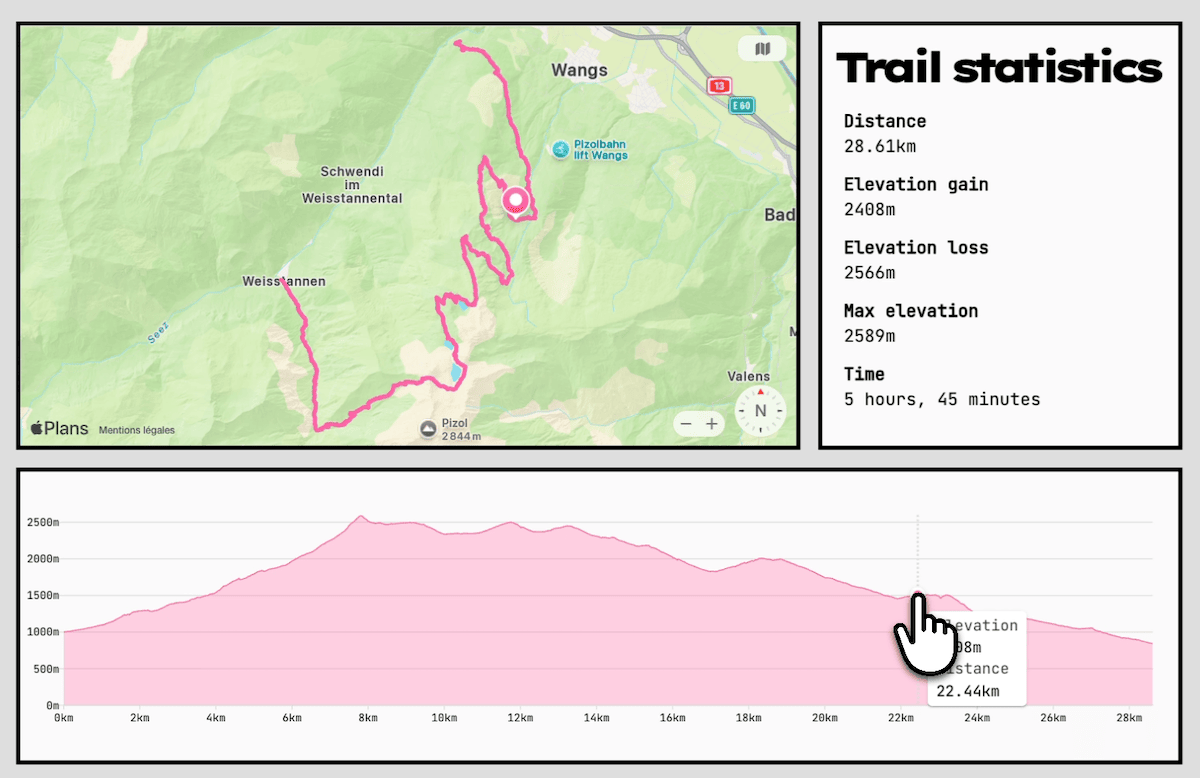
This can be achieved by getting some metadata through a hover callback on the chart, most charting libraries support this, I used LayerChart. In this case, the metadata is the unique id of the point, and I update the map whenever the value changes.
// Not a state on purpose. Used for logic, not rendering.
let selectedPoint: MarkerAnnotation | undefined | null = undefined;

$effect(() => {
    if (selectedPointId === undefined) {
        if (selectedPoint !== undefined && selectedPoint !== null) {
            map.removeAnnotation(selectedPoint);
            selectedPoint = null;
        }
        return;
    }

    const point = points.find(({ id }) => id === selectedPointId);

    if (point === undefined) {
        return;
    }

    const coordinate = new mapkit.Coordinate(point.lat, point.lon);

    if (selectedPoint === undefined || selectedPoint === null) {
        selectedPoint = new mapkit.MarkerAnnotation(coordinate, {
            color: "#ff65a9",
            glyphText: "●"
        });
        map.addAnnotation(selectedPoint);
        return;
    }

    selectedPoint.coordinate = coordinate;
});
In a first approach, I removed and recreated the marker every time the selected point changed, but that turned out to be laggy, what a surprise 😂. I figured out I could just keep a reference to the rendered annotation and update its coordinate instead, which moves the point fast enough.
Putting it all together
That's basically it for rendering a map with some points and routes plus some real time interaction. You'd likely need to tweak it for your needs, but I hope it gives you a quick start.
For the Svelte lovers, here's the full implementation. Not that proud of it, I find it a bit overbloated. If this weren't my website and some more professional work, I would like to split the effects to have better control, but yeah, if it works, it works 😄.
Going to production
I mentioned earlier that loading the map requires a token, and that it can be scoped to a specific domain. So when I was ready to go live, that's exactly what I did, generated a real token. Or rather, tokens, plural, since I actually needed two: my site is reachable both on daviddalbusco.com and www.daviddalbusco.com, and Apple only lets you scope a token to one domain at a time, not both at once.
Once I created those two tokens, I had to integrate them into my website. Since it is prerendered, the simplest approach would have been to use two environment variables and drop the tokens in a .env file. Even if the repo is public, that's not really a big deal, the tokens end up on the frontend anyway, on the client side, and are de facto public regardless.
# .env
PUBLIC_MAPKIT_TOKEN_ROOT=...
PUBLIC_MAPKIT_TOKEN_WWW=...
Still, it felt nicer, or cleaner, to keep them out of the repo. Instead, I could have used GitHub Actions secrets and referenced them in the build workflow:
- name: Build
  run: npm run build
  env:
    PUBLIC_MAPKIT_TOKEN_ROOT: ${{ secrets.MAPKIT_TOKEN_ROOT }}
    PUBLIC_MAPKIT_TOKEN_WWW: ${{ secrets.MAPKIT_TOKEN_WWW }}
I was about to do exactly that, but then I thought, why not build something a bit more fun instead 🤪.
Since I self-host the site with Kyushu, I have a backend worker that serves the assets on the web, but it can do more than that. The same function can also act as an API and supports env vars. So why not extend it to also serve the token, by adding a /api/mapkit/token route that responds to GET requests 💡:
export default {
    async fetch(request, env) {
        const { pathname } = URL.parse(request.url) ?? { pathname: undefined };

        if (request.method === "GET" && pathname === "/api/mapkit/token") {
            return; // TODO returning the token
        }

        return await fetchAsset(request, env);
    }
} satisfies ExportedHandler;
Returning the token is relatively straightforward, it's basically just about identifying the GET request and providing back an adequate JSON body, but there were two tricks I had to work out.
Given there are two tokens, one for the root domain and one for www, the function needs to know which domain it's actually being called from, since there's just one function serving both. Locally, reading the Host header would have been enough, but in production I run Caddy as a reverse proxy in front of it, and that value no longer matches. Fortunately, I found out I could use x-forwarded-host, the header that carries the original host that was requested.
Aside from this, my first implementation didn't work either, because I declared the record holding the environment variables globally. Since Kyushu freezes the worker's memory and only evaluates variables at runtime, those ended up undefined. That's why I had to move the reading of those variables inside the function itself, so they're evaluated at request time.
const resolveHost = (request: WorkerRequest): string | undefined =>
    request.headers?.["x-forwarded-host"] ?? request.headers?.host;

const fetchMapkitToken: ExportedHandler["fetch"] = async (request) => {
    const host = resolveHost(request);

    if (host === undefined) {
        return {
            status: 405,
            body: "Method Not Allowed"
        };
    }

    const MAPKIT_TOKENS: Record<string, string | undefined> = {
        "daviddalbusco.com": process.env.MAPKIT_TOKEN_ROOT,
        "www.daviddalbusco.com": process.env.MAPKIT_TOKEN_WWW
    };

    const token = MAPKIT_TOKENS[host];

    if (token === undefined) {
        return {
            status: 403,
            body: "Forbidden"
        };
    }

    return {
        status: 200,
        headers: {
            "content-type": "application/json",
            "cache-control": "no-store"
        },
        body: JSON.stringify({ token })
    };
};
Lastly, on the client side, I modified the loading of the map to pre-fetch the token first before using it to load the map (instead of the plain hardcoded value from the earlier chapter):
export interface MapKit {
    mapkit: AppleMapKit;
    map: Map;
}

export const loadMap = async (args: { anchor: HTMLElement }): Promise<Result<MapKit>> => {
    return await safeExec(async () => {
        const token = await loadToken();
        return await loadMapKit({ ...args, ...token });
    });
};

const loadMapKit = async ({
    anchor,
    token
}: {
    anchor: HTMLElement;
    token: string;
}): Promise<MapKit> => {
    const mapkit = await load({
        libraries: ["map", "annotations", "overlays"],
        token
    });

    const map = new mapkit.Map(anchor);

    return {
        mapkit,
        map
    };
};

const loadToken = async (): Promise<{ token: string }> => {
    const response = await fetch("/api/mapkit/token");

    if (!response.ok) {
        const text = await response.text();
        throw new Error(`${response.status} ${text}`);
    }

    return await response.json();
};
Unrelated but somehow related note, you may notice in the snippet above that I used a safeExec function and a Result type. Those are tiny helpers I use across my projects, as I came to the realization that relying on throwing exceptions results in try/catch scattered everywhere, and can also, to some extent, result in uncaught issues. That's why I prefer to use a pattern like this, likely inherited from my work with Rust 🦀.
export type Result<T> = { status: "success"; result: T } | { status: "error"; err: unknown };

export const safeExec = async <T>(fn: () => Promise<T>): Promise<Result<T>> => {
    try {
        const result = await fn();
        return { status: "success", result };
    } catch (err: unknown) {
        return { status: "error", err };
    }
};
Conclusion
I'm a hobbyist, so don't expect ultra distances, marathon is about as far as I go, but if you are curious about the result you can see them live on the Trails page. Most routes I follow are convenient for day trips from Zürich. If you'd like to follow any of them and have questions, reach out!
Until next time!
David